This post may contain affiliate links. Please read our disclosure policy.
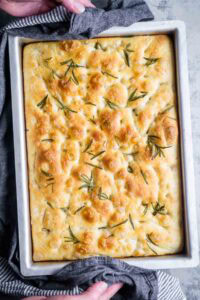
These easy yeast rolls are soft, pillowy, golden quick rolls made with one rise and simple ingredients. They're perfect for beginner bakers–and anyone who wants fluffy dinner rolls in under 2 hours.
Try my quick cinnamon rolls or my easy French bread recipe next!

Want to Save This Recipe?
Enter your email & I'll send it to your inbox. Plus, get great new recipes from me every week!
By submitting this form, you consent to receive emails from The Kitchen Girl.
Quick-Rise Rolls Equals Comfort On Demand
There's something so satisfying about pulling a tray of homemade rolls from the oven—especially when they only need one rise. This is the recipe I have used for years when I want fresh, pillowy-soft dinner rolls in under 2 hours. It’s easy, reliable, and always a huge hit!
Why You'll Love This Recipe
- Quick and simple. Quick dinner rolls means you get to skip the 1st rise required with classic dinner rolls made with active dry yeast.
- Beginner-friendly. My step-by-step recipe with photos and recipe video walks you through the process of making homemade dinner rolls the easy way.
- Equipment flexibility. Scales and stand mixers are optional, though I included instructions for them.
- Pillowy-soft texture. The combination of milk, butter, and just the right kneading for gluten development creates tender, fluffy rolls.

Ingredients You'll Need
- Milk – Adds moisture and tenderness to homemade dinner rolls. Use any fat content. I usually use 2% milk, but also used plant based milk and cannot tell the difference!
- Unsalted Butter – This adds richness to the dough. You can use salted butter if you like.
- All-Purpose Flour – Unbleached all purpose flour is my go-to variety for most of my baking needs. You can use bread flour in equal amounts if you prefer a chewier texture in your dinner rolls.
- Instant Yeast – Also called quick yeast or RapidRise yeast. Speeds up the rise time as it eliminates the bulk fermentation step, or first rise, from the kneaded dough.
- Egg – Adds richness and moisture to the rolls.
- Sugar – This feeds the yeast, adds subtle sweetness, and enhances browning.
- Sea Salt – Balances flavor and, trust me, you don't want to forget this very important ingredient!

How to Make Yeast Rolls
Enjoy these abbreviated photo instructions, or skip to the full, printable recipe below.
Whisk together the flour, instant yeast, sugar, and salt. Add the melted butter, egg, and warmed milk. Stir by hand, or use a stand mixer, to mix the ingredients into a rough, shaggy dough.


Knead the dough by hand on a floured surface for 8–10 minutes or use a stand mixer on low speed for 6–8 minutes. Dust with flour as needed to prevent the dough sticking. You want the dough to be smooth, elastic, and slightly tacky but not sticky.


Use your hands to shape the dough into a smooth round. Cover and rest for 10 minutes to relax the dough.


Divide the dough in half, then halve each piece again. Continue halving until you have 16 equal pieces. Press out air bubbles, flatten slightly, then shape each into a tight ball.


Arrange the rolls seam-side down in a greased baking dish with space between each. Cover and let rise in a warm spot for 20–30 minutes, or until doubled. Bake the rolls in a preheated 375°F oven for 18–20 minutes. Brush with melted butter, serve warm, and devour!


Recipe Tips
- Choose the right flour. Use all-purpose flour and avoid cake or pastry flour as they lack the protein and strength to support a good rise.
- Measure flour properly. Spoon flour into your measuring cup and level it off with a knife—don’t scoop, or you may pack in too much and get dense rolls.
- When to stop kneading dough. The dough should feel smooth and stretchy when it's done kneading. Press gently into it with your finger—it should spring back slowly and not feel wet or sticky.
- No scale required. Sure, you can use one, but it's quicker to use the divide-by-halving method to create consistent roll sizes without weighing the dough.
- Always cover the dough. Prevent drying out the dough at any stage of the process by covering with plastic wrap or a clean towel.
Kitchen Gear I Use for This Recipe
- An oven thermometer helps you confirm if your oven is running hot or cool—crucial for consistent, accurate baking.
- I use glass measuring cups to warm the milk and melt the butter in the microwave.
- Here’s the KitchenAid stand mixer I have used for over 10 years. Here's the glass mixing bowl if you're feeling extra. But honestly you can live without it.
- This bench scraper makes it easy to divide the dough and also clean the counter afterward.
- I'm using a ceramic baking dish, but metal bakeware can be used interchangeably with this yeast roll recipe.
Serving Suggestions
- Serve warm with butter, jam, or pesto.
- Pair with spiral ham or roast turkey breast for your holiday dinner.
- Use these dinner rolls as slider buns for my delectable pulled pork sliders.

Storing & Reheating
Homemade yeast rolls are best on the day they were baked. They won’t stay soft like the shelf-stable store-bought ones, but a quick reheat brings them right back to life. Please don't serve them without first reheating in a 350°F oven (wrapped in foil) for 5-8 minutes or microwave in short bursts until warm.
To store, always let warm dinner rolls cool completely. Store in an airtight container for up to 3 days.
More recipes you'll love
📖 Recipe

Easy Yeast Dinner Rolls
Want to Save This Recipe?
Enter your email & I'll send it to your inbox. Plus, get great new recipes from me every week!
By submitting this form, you consent to receive emails from The Kitchen Girl.
Video
Note about scaling
When scaling, the light gray ingredient notes after the comma don’t change. Adjust as needed.
Ingredients
- 1 ½ cups Milk, any fat content
- 4 tablespoons Unsalted Butter
- 5 cups All-Purpose Flour (660g), plus ¼ cup for mixing
- 1 (.25-oz pkg) Instant Yeast, *or 2 ¼ teaspoons Active Dry Yeast
- 1 Egg, beaten
- 2 tablespoons Sugar, optional
- 1 ½ teaspoons Salt
Optional Finish
- 1 tablespoon Unsalted Butter, melted
Instructions
- Warm the milk:For INSTANT YEAST: Heat the MILK to 120–130°F, then proceed to the next step. No need to activate.For ACTIVE DRY YEAST: Heat the MILK to 100–110°F, whisk in the ACTIVE DRY YEAST, and let it rest 5–10 minutes until foamy. ATTN: Please see the footnote regarding the dough rising time for active dry yeast.Melt the BUTTER separately and let it cool slightly. Coat a 13 x 9 or a 9 x 9 baking pan with cooking spray and set aside.
- Combine the ingredients: In a large mixing bowl (or stand mixer), stir together the FLOUR, INSTANT YEAST, SUGAR, and SALT. Add the MELTED BUTTER, EGG, and warmed MILK. Mix with a spoon (or on low speed) until the dough looks rough and shaggy.
- Mix and knead: Turn the dough onto a flat surface (or continue mixing on low speed) and knead up to 10 minutes, adding sprinkles of FLOUR only when the dough clings to your hands (or the mixing bowl). Knead until the dough feels smooth, stretchy, and slightly tacky. Shape the dough ball into a tight round, cover, and let it rest for 10 minutes to relax the gluten, making the next step easier.
- Shape the rolls: Cut the dough ball in half, then halve each one again. Continue halving until you have 16 pieces. Press each piece lightly to release air, then tuck the edges underneath and roll with a cupped hand to form a smooth ball. Place the rolls seam-side down in the baking dish with a little space between each.
- Let the rolls rise: Cover loosely with plastic wrap and let the rolls rise in a warm spot for 20–30 minutes, or until puffy and nearly doubled. When gently tapped, the rolls should feel soft and airy.
- Preheat the oven: Heat the oven to 375°F. You can keep the rolls nearby to benefit from the indirect oven heat as it comes to temperature.
- Bake: Bake the rolls for 20–25 minutes, or until the tops are golden brown. I prefer to use a quick-read thermometer to confirm the center of the rolls reaches 190–200°F.
- Cool slightly: Move the pan to a cooling rack, brush with MELTED BUTTER if you like, and let the rolls rest for 5 minutes before serving.
- Store and reheat: Cool the rolls completely before storing. Keep them in an airtight container at room temperature for up to 3 days. Reheat in the microwave for 10–15 seconds, or warm them in a 350°F oven wrapped in foil.
Recipe Notes
-
- Choose the right flour. Use all-purpose flour and avoid cake or pastry flour as they lack the protein and strength to support a good rise.
-
- Measure flour properly. Spoon flour into your measuring cup and level it off with a knife—don’t scoop, or you may pack in too much and get dense rolls.
- Sugar isn't required for yeast rolls. Feel free to reduce or omit the sugar entirely if you like. This recipe will be just as tasty and effective without it.
-
- When to stop kneading dough. The dough should feel smooth and stretchy when it's done kneading. Press gently into it with your finger—it should spring back slowly and not feel wet or sticky.
-
- No scale required. Sure, you can use one, but it's quicker to use the divide-by-halving method to create consistent roll sizes without weighing the dough.
-
- Always cover the dough. Prevent drying out the dough at any stage of the process by covering with plastic wrap or a clean towel.
Equipment
- instant-read thermometer optional
- large mixing bowl or stand mixer bowl
- silicone spatula or other stirring utensil
- knife or bench scraper to divide the dough
- 9x13 baking dish or 8x8 baking dish
- plastic wrap to cover the dough
- pastry brush optional - to brush butter before serving
Nutrition
Nutrition facts are estimates and may vary based on brands, ingredients, and portions.


Ann says
Can the sugar be reduced to 1 Tbsp?
Traci says
Yes! You can even leave it out entirely. It won't affect the quality or texture of these rolls. Let me know if you have further questions. Enjoy!
Allen says
So good!! Love these with butter, but have been enjoying them as slider rolls this week. A few seconds in the microwave brings them right back to freshly baked!
Heidi says
This is the perfect side for literally almost any dinner! I especialy like that this recipe only requires a few ingredients that I almost always have on hand... and the actual hands on time is so minimal, too!
Traci says
Yes!! I'm so glad you're loving it! Thanks so much for letting me know. Enjoy!!
MB says
Gosh these are decadent–yet so simple! Your instructions make it so easy. Hands down my go-to roll for every occasion that calls for dinner rolls. Thank you for sharing. Love all of your bread recipes!