Easy Turkey Gravy from Drippings
Save those pan drippings! They’re liquid gold for this homemade turkey gravy recipe. Here’s how to make an easy turkey gravy from even a tiny amount of pan drippings, flour, and broth. It's rich, silky, and ready in minutes.
Servings: 4 cups
Calories: 17kcal
Equipment
- 9-inch fine mesh sieve optional for straining turkey drippings
- measuring cup and spoon
- 3-quart saucepan or use your turkey roasting pan
Ingredients
- Any amount of turkey drippings or ½ cup butter if not using drippings
- ½ cup All-Purpose Flour
- 4 cups Chicken Broth or turkey broth or vegetable broth
- Salt and Black Pepper to taste (be generous with it)
Instructions
- How to use turkey drippings: After roasting your turkey, pour all of the juices from the bottom of the roasting pan through a fat separator or fine-mesh sieve set over a glass measuring cup. Discard any solids left in the sieve.
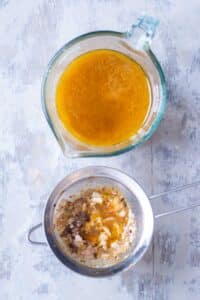
- Skim and measure the fat: Let the drippings sit until the fat rises to the top, then skim it into a separate measuring cup. Reserve any remaining liquid as the broth for your gravy.Note: If you don’t have ½ cup total fat, add enough butter to make up the difference. Even if you have only one tablespoon of turkey fat, use it.
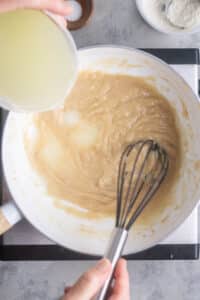
- Make the roux: Place the ½ cup of skimmed fat (or BUTTER) in a saucepan over medium heat. When it’s melted and hot, whisk in the flour to form a roux. Cook for a few minutes, whisking as it turns golden brown to build flavor and color.Note: You can make the roux directly in the roasting pan, but I prefer the control and compactness of a saucepan.

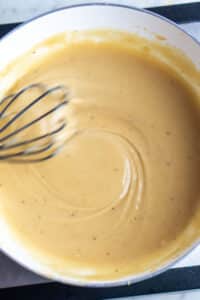
- Add the liquid: Gradually whisk in the liquid from the drippings or broth, adding a little at a time to keep the mixture smooth. Continue whisking and simmering for about 5 minutes, or until the gravy thickens to your liking.
- Adjust the consistency: If the gravy is too thick, whisk in a little broth to thin. If it’s too thin, mix 1 teaspoon each of flour and water to form a paste, then whisk it in and simmer until thickened.
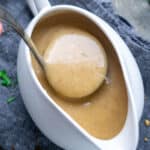
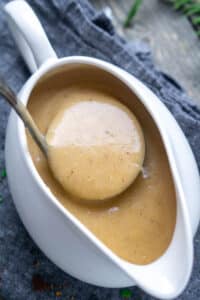
- Serve: Your turkey gravy is ready to serve and enjoy!To store, let it cool completely and refrigerate in an airtight container for up to 5 days or up to 90 days in the freezer.
Video
Notes
Understanding drippings: After roasting, the drippings naturally separate — golden fat on top, flavorful juices below. You’ll use both for rich, classic gravy flavor.
Roux color: The longer you cook the roux, the darker and deeper the gravy flavor will be. For a light, mild gravy, stop when it’s golden. For a darker, roastier flavor, cook it a little longer.
Smoothing out lumps: A good whisk keeps the gravy lump-free, but if any appear, pour the finished gravy through a fine-mesh sieve for a silky finish.
Making ahead: Turkey gravy can be made in advance and refrigerated. The flavor actually improves as it sits, so it’s a great dish to prepare ahead of time.
Reheating: Warm the gravy over medium heat on the stove, whisking occasionally until heated through. Or microwave on medium power in short intervals, stirring between each until smooth.
Nutrition
Serving: 4tablespoons | Calories: 17kcal | Carbohydrates: 1g | Protein: 0.2g | Fat: 1g | Saturated Fat: 1g | Polyunsaturated Fat: 0.1g | Monounsaturated Fat: 0.4g | Trans Fat: 0.1g | Cholesterol: 4mg | Sodium: 66mg | Potassium: 4mg | Fiber: 0.03g | Sugar: 0.1g | Vitamin A: 45IU | Calcium: 1mg | Iron: 0.1mg