This post may contain affiliate links. Please read our disclosure policy.
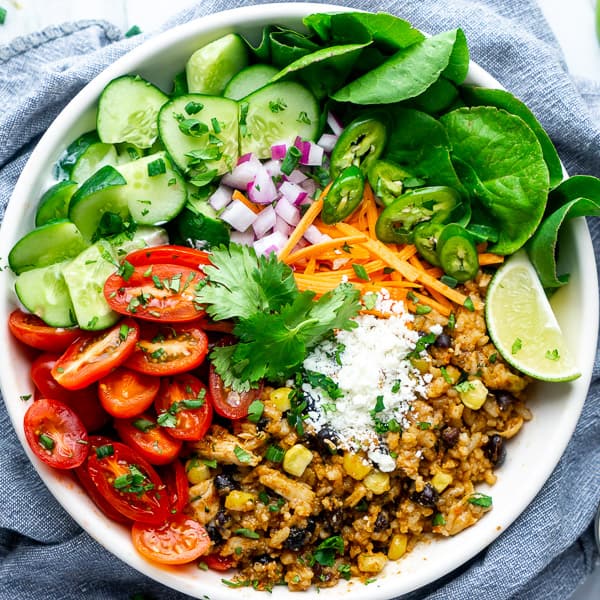
Instant Pot Chicken Burrito Bowls are loaded with chicken, rice, beans, corn, and vegetables. Load the cooker, prep fresh toppings, and eat smart on weeknights with minimal effort.

Want to Save This Recipe?
Enter your email & I'll send it to your inbox. Plus, get great new recipes from me every week!
By submitting this form, you consent to receive emails from The Kitchen Girl.
Instant Pot Chicken Burrito Bowl makes it nearly effortless to create a scrumptious and nutritious filling for bowls, tacos, and enchiladas. This one pot burrito bowl recipe lets you load the cooker and do other things, just like Chicken Pasta Alfredo and Tuna Noodle Casserole. We like to spend the time prepping fresh, healthy toppings while the cooker is busy doing all the work.
If you love easy Instant Pot dinners, make this taco pasta dinner or this family-favorite pressure cooker whole chicken.
Key ingredients
Ingredient amounts are included in the printable recipe below.
- cooked beans - use canned beans or Instant Pot black beans. You can omit and substitute them with other ingredients too.
- corn - frozen, fresh, or canned
- salsa picante - some readers love to use rotel instead!
- chicken broth - or vegetable broth
- taco seasoning - use this 5 minute homemade taco seasoning, or the packaged kind if you have some on hand.
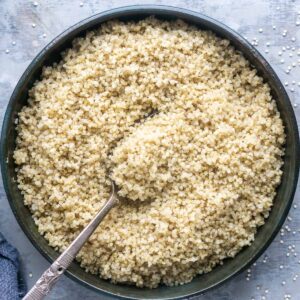
- uncooked basmati rice - or any long grain white rice
- boneless, skinless chicken breast - must be completely thawed for this recipe
- cilantro, lime, and Cotija cheese - recommended toppings for authentic Mexican flavor

How to make chicken burrito bowls in the Instant Pot
Get the full printable recipe card below.
- To the Instant Pot, stir together BEANS, CORN, TACO SEASONING, PEPPER, and CHICKEN BROTH. Add (well-rinsed) RICE and PICANTE and push the rice under the liquid with a utensil.
- Place chicken (and more taco seasoning, if desired) on top of ingredients. Note: If using frozen chicken breast, it must be completely thawed to cook properly with this recipe.
- Pressure cook for 5 minutes on high pressure followed by a 10-minute natural pressure release (NPR). Open lid and confirm chicken is 165°F internal temperature. Transfer chicken out, cover with foil, and rest a few minutes.
- Shred the chicken breast.
- Stir it back into the filling in the Instant Pot.
- Serve the chicken bowl warm, customized with fresh ingredients.

How to use burrito bowl filling
You can use this filling as chicken burrito bowls piled up with fresh ingredients like you see in my photos. Or, you can use the filling for enchiladas, nachos, totchos, taco pizza, or substitute it for taco meat in this taco bowl recipe.
Customizable toppings
This recipe is naturally low in saturated fat and the sky's the limit for toppings. Adding plenty of produce will add loads of color, texture, and nutrition to this chicken burrito bowl.
- lettuce and tomato
- cucumber, carrots, onions
- cilantro and lime
- salsa
- Jalapeno or Serrano peppers (fresh or pickled)
- sliced avocado, guacamole, or Avocado Ranch Dressing
- cheese (I used Cotija but any cheese will work)
- sour cream
Ingredient substitutions
- boneless chicken thighs - You can use thighs in place of chicken breast in this recipe using the same pressure cook time.
- bone-in chicken thighs or breast - I don't recommend bone-in chicken for this recipe because they require too much cook time, causing the rice to overcook.
- frozen chicken breast - I don't recommend these because the time it takes to properly pressure cook the chicken breast will overcook the rice in this recipe. However, you can use frozen chicken tenders without thawing before pressure cooking. It's wonderful how well this works!
- brown rice is not recommended (unless you add it at the end)- Since the rice and chicken breasts are pressure cooked together, brown rice isn't recommended because the required cook time will overcook the chicken.
- beef or lamb - If you want to switch it up and use beef or lamb instead of chicken, check out this copycat Chipotle Barbacoa Recipe.

How to meal prep chicken burrito bowls
We always take a meal prep approach to these burrito bowls for lunches or dinners. To make a chicken bowl in advance, pressure cook the filling ingredients and chop produce (chop avocado upon serving). Store ingredients separately; i.e, burrito bowl filling in a airtight storage container and produce in another container. When prepping lunch for the next day, I heat the burrito bowl filling and then pile on the ingredients. You'll definitely want to add a splash of broth or water when reheating the filling.

Mexican recipes we love
- Easy Chicken Tortilla Soup
- Ground Turkey Taco Skillet
- Best Taco Meat Recipe
- Cilantro Lime Rice
- Totchos [Tater Tot Nachos]
📖 Recipe

Instant Pot Chicken Burrito Bowl
Want to Save This Recipe?
Enter your email & I'll send it to your inbox. Plus, get great new recipes from me every week!
By submitting this form, you consent to receive emails from The Kitchen Girl.
Video
Note about scaling
When scaling, the light gray ingredient notes after the comma don’t change. Adjust as needed.
Ingredients
- 1 (15 ounce can) Black Beans, drained and rinsed
- 1 cup Corn, frozen, canned, or fresh
- 2 tablespoons Taco Seasoning, or 1 (1-ounce packet) * see footnote
- ½ teaspoon Black Pepper
- 1 ½ cups Chicken Broth, or preferred cooking liquid
- 1 cup Uncooked Long Grain White Rice, rinsed until water runs clear
- 1 cup Picante Sauce or Chunky Salsa
- 1-2 Boneless Skinless Chicken Breast
- Salt, to taste
Instructions
- To the Instant Pot, add BLACK BEANS, CORN, TACO SEASONING, BLACK PEPPER and CHICKEN BROTH. Stir to combine.
- Add (well-rinsed) RICE and PICANTE SAUCE. Don't stir. Use a utensil to gently spread the rice out and push it just under the liquid.
- Lay CHICKEN BREAST(S) on top of the ingredients in the Instant Pot. Sprinkle more taco seasoning on the chicken, if desired.
- Close the lid, turn pressure release valve to “sealing", and pressure cook on HIGH for 5 minutes (this cycle takes 20 minutes in real time).
- When cook cycle completes, allow a 10-minute natural pressure release (NPR). DO NOT skip this step because the rice and chicken are still cooking.
- Carefully turn pressure valve to "Venting" position to release any remaining steam.
- Press "Cancel", open the lid, and insert an instant-read thermometer in the chicken center to confirm minimum 165°F. Transfer chicken out, cover, and rest a few minutes. *see recipe footnote about internal temperature
- Shred the chicken and stir it back into the burrito bowl filling. Add SALT to taste.Tip: Since rice absorbs moisture even after cooking, add a few splashes of broth/liquid to loosen up the filling as needed.
How to serve chicken burrito bowls
- Serve burrito bowl filling in bowls with your choice of toppings. I'm using lettuce, tomatoes, cucumber, carrots, red onion, cilantro, jalapenos, lime, and Cotija cheese.
Storage and reheat instructions
- Store the filling separate from toppings in an airtight container up to five days in the refrigerator.
- To reheat burrito bowl filling, add a splash of liquid to loosen it up and reheat via stove or microwave, stirring as needed.
Recipe Notes
-
Am I using a different brand/model/size pressure cooker?
-
Did I stray from the recipe ingredients or directions (even accidentally)?
-
Was my sealing ring properly seated?
-
Was my pressure valve fully in the “Sealing” position?
-
Is my float valve functioning properly?
-
Do I live in a higher altitude?
Equipment
Nutrition
Nutrition facts are estimates and may vary based on brands, ingredients, and portions.


Kellie says
I just want to let you know that I am sooooo grateful to you for putting the actual SIZE of a serving on your recipe!!! It makes my diet so much easier to track. Also, I love this recipe so much, as does my whole family! I do soak my rice for as long as possible before I make this, and it seems to make the rice cook easier/faster. I also add a little more broth just because we like it better that way, and it seems to help keep that dang burn notice away too! Thanks again for this recipe!!
Traci says
Of course! I'm so happy you're enjoying the recipe and my serving size transparency 😉 It's funny, I've never gotten the overheat warning with this recipe, but your strategy sounds like the perfect workaround for anyone with that issue. Thanks for sharing - and for the review 🙂 Enjoy!
Trisha says
This is one of my favorite instant pot recipes but is a little heavy on rice. I put the chicken on a trivet and have doubled the amount of chicken successfully. Do you think I could double the black beans and keep everything else the same? Thanks for all of the cooking inspiration!
The Kitchen Girl says
Hiya! I'm glad to hear you enjoy this recipe. The trivet is good for that! As for doubling beans, it's possible that the added volume may not allow the rice to sit below the liquid level. As long as it does, then I think you're all good. Let me know if you have further questions. Enjoy!
Jessica says
I love this recipe! I make some variation of tacos every week and this has been my go to for the last 2 months. So simple and delicious, plus a great recipe for lunch meal prep!
The Kitchen Girl says
Awesome Jessica! I'm so glad you're loving this one as much as we do! You're right - it really is versatile. I really appreciate you taking the time to leave feedback. Thank you xoxoxo
Robin says
I love this recipe, but each time I've made it my rice doesn't cook all the way. I've tried adding more liquid (increased to 2 cups total) and more time, with the same results. What could I be doing wrong? I'm rinsing the rice for at least 5 minutes before adding it to the recipe, using long grain rice as recommended. Everything else is great!
The Kitchen Girl says
Hi Robin, I'm glad to hear from you. What you're saying is definitely uncommon. It sounds like your pot isn't pressurizing fully, which can happen when the sealing ring isn't seating properly or if the pressure release valve isn't completely closed. This causes too much steam to leak during the pressure cook cycle, which leads to unintended results. Does this sound possible to you? Let me know and we'll go from there. Thanks so much! 🙂
Michelle says
Very good recipe. My family really liked it. I will just put a little more spices and add a little more salt to our taste. My son made a wrap and really enjoyed it.
The Kitchen Girl says
Oh yes, my recipes are somewhat minimally seasoned on purpose to be family friendly. That way nothing is ever too spicy or too salty and can be easily adjusted. I'm glad it was enjoyed. Thanks for taking the time to leave feedback. 🙂
Jenn says
Just made this tonight after seeing your post recently in the Instant Pot Facebook group. (I was the one who asked about using arborio rice.) I used quinoa and kept the recipe as is - just used a whole can of corn and 2 lbs of chicken breasts. It came out perfectly! I served it over baby spinach for me, and had toppings of avocado, queso fresco, fat free Greek yogurt (our alternative for sour cream), etc. This is a keeper - thank you!
The Kitchen Girl says
Yay! Yes, I totally remember your rice question 🙂 I love it that you went for the quinoa and glad it turned out well for you. I'll give that a try next time I make it. Thanks for taking the time to leave feedback! Cheers!
Kayla says
Was planning to make tacos tonight and then stumbled across this recipe. I think we will be trying it out! Can I sub ground turkey for the chicken?
The Kitchen Girl says
Hi Kayla, yes you can use ground chicken. To do so, you'll need to saute the chicken in the cooker with a little cooking oil (using the Saute function). Once it's fully cooked, add the other ingredients and follow recipe accordingly. Hope you enjoy! Thanks 🙂
Jennifer says
Can't wait to try this CHICKEN BURRITO BOWL !! I love the French Bread recipe and the Veggie Lo Mein noodle recipe.
Good Job TRACI !! Thank you 🙂
The Kitchen Girl says
Yay Jennifer! So glad you're enjoying those other recipes and let me know if you have any questions about this burrito bowl 🙂 Enjoy!
Tiffaney says
This was my second recipe from your site and it’s another winner. This was so delicious! A perfect weeknight meal. The leftovers were awesome the following two nights, and we loved being able to change up the toppings. We have another recipe of yours on deck for the coming week!
The Kitchen Girl says
Awesome, Tiffaney...we're pretty crazy about the versatile leftovers too! Thanks for taking the time to leave feedback...so glad you enjoyed ☺️
Randi says
Have you ever tried doubling the recipe? Like for a family of four?
The Kitchen Girl says
Hi Randi, I have not doubled this recipe because it makes 6 cups of filling, which is plenty when using is as filling for bowls, burritos, nachos, tacos, etc. That said, you should be able to double with no problem 🙂 Enjoy!
Stephanie says
Love this recipe! If I wanted to attempt to double it, what do you suggest for cooking time? Thanks!
The Kitchen Girl says
Hi Stephanie, no time adjustment is necessary. The Instant Pot knows what to do. I'm glad you're enjoying the recipe. This recipe is one of my favs, for sure! Thanks so much for the review 🙂
Kim says
Can you make this with brown rice? Looks deelish!!! Thanks!
The Kitchen Girl says
Hi Kim, I don't recommend making this with brown rice because the chicken will overcook in the time it takes to cook the rice. However, you could add cooked brown rice to the pot once everything is pressure cooked. Hope that works for you 🙂
J Allen says
Perfect for beginners and non-cooks. Dump everything in, chop some produce while the filling cooks, and boom dinner! The chicken breast is always perfectly cooked too. Love this burrito bowl!
Stacey says
If I wanted to make this without the rice, would I lower the amount of liquid? Would cooking time be the same? It looks so delicious, just want to control the amount of rice per serving.
The Kitchen Girl says
Hi Stacey, yep, I'd probably reduce the broth by half, but follow the same recipe for everything else, including instructions. Hope you love it! Let me know if I can help again anytime 🙂
Amanda says
I love that this cooks in the Instant Pot! It makes it so easy for weeknights, and I love how customizable it is with toppings to keep things interesting. Great recipe!
The Kitchen Girl says
Thanks Amanda! So glad to hear you're enjoying this recipe
Katie says
Looks so good! I have some friends that would go crazy for this!
The Kitchen Girl says
Hehe, thanks Katie! Appreciate any shares with friends
Emily says
This is my kind of meal! My whole family loves burrito bowls and I love that it's made in the instant pot! Such a simple weeknight recipe... I'll be making on repeat now that remote learning is back at our house!
The Kitchen Girl says
Awesome, Emily...so glad you can enjoy this one! Enjoy and best of luck getting back into the school year
Annemarie says
Bowls are one of our favorite types of dinners and a one-pot bowl that cooks itself is even better! It's so easy to prep all the toppings while the cooker does its work, perfect for weeknight meals.
The Kitchen Girl says
Thanks, Annemarie...YES! Glad you can enjoy burrito bowls as much as we do Love the IP even more for this!
Cookilicious says
I love that this is all made in the Instant Pot! Awesome recipe!
The Kitchen Girl says
Thank you! Yes, the Instant Pot rocks this meal
Jessica Formicola says
Next time I'm skipping the lines at Chipotle and making these delicious looks burrito bowls at home!
The Kitchen Girl says
Right on, Jessica...you will love them! Thanks
Patt says
What is that clear collar you are using around the outside edge of the instant pot insert? It’s not mentioned in your tools list. I haven’t made this yet but cooking the chicken breast above the rice mixture looks like a great technique. Thanks!
The Kitchen Girl says
Hi Patt, there's no extra tools used here...it's just how the 6qt IP Duo looks from overhead. Enjoy the recipe
JB says
Always delicious and couldn't be easier to throw everything in the pot and chop a few toppings while it cooks. Chicken breast is always tender with this method. Another winner KG!
The Kitchen Girl says
Awesome! I'm glad you like this one as much as I do! 🙂
Farah says
Just got an instant pot so this is the perfect recipe !! Can’t wait to try this out I love mexican food!
The Kitchen Girl says
Awesome, Farah! Glad you can enjoy it
Bintu | Recipes From A Pantry says
I love a burrito bowl and this looks super delicious! Love that it takes just a short time to put together too!
The Kitchen Girl says
Thanks Bintu! Yep 30 minutes and this burrito bowl is on the table
Sue says
Instant Pot - yes. Burrito Bowl - yes. Easy and good - YES!
The Kitchen Girl says
Hehe, I'm a whole bunch of YES on this one too! Thanks, Sue 🙂